3D Generate
Ⅰ. About Rendora Video Production
1. How Videos Are Made
Traditional video production, such as for a launch event, usually involves these steps: resource preparation, live shooting, and post-production.

2. Creating Videos with Rendora
With Rendora, all elements of professional video creation can be managed with just one device:
- Avatar: 1000+ hyper-realistic 3D avatars. Customize clothing, hairstyles, accessories, and facial features.
- Studio: Select from studios that mimic real-world environments and production qualities, including specific environments for conferences or educational training.
- Script: Avatars speak lines from your script—enter it manually, upload a file, or generate one via AI.
- Media: Add images, videos, PPTs, or PDFs as supporting materials, enhancing the video with visual content.
- Shot: Rendora automatically generates various camera movements with AI, also allowing custom camera angles.
- Elements: Enhance your video by adding background music, sound effects, subtitles, intros, outros, stickers, and more.
3. Video Components
On the Youyan video creation page, you’ll find the video creation panel:
- Template Center: Start your project with existing works. Includes the official template library and your own creations.
- 3D Avatar Creation: Customize your digital avatar’s outfit and appearance, including clothing, hairstyle, accessories, makeup, and facial features.
- AI Generation: Provides a complete video creation process—edit scripts, select materials, scenes, characters, and voice tones. After 3D generation, you can further optimize shots and enhance the video with packaging elements.
- 3D Generation: Choose on-screen characters, scenes, materials, and script segments.
- Camera Optimization: Fine-tune camera motions and angles.
- Video Packaging: Add music, sound effects, stickers, subtitle templates, intros, outros, and other packaging elements.

Ⅱ. Quick Start
1. Understanding AIGC 3D Generation
Rendora’s platform uses advanced AI to convert text into 3D videos—automatically animating avatars, voices, facial motions, and dynamic shots.
4-Step 3D Video Generation:
1. Click [Create] at the top right and choose output video orientation ([Landscape] / [Portrait]).
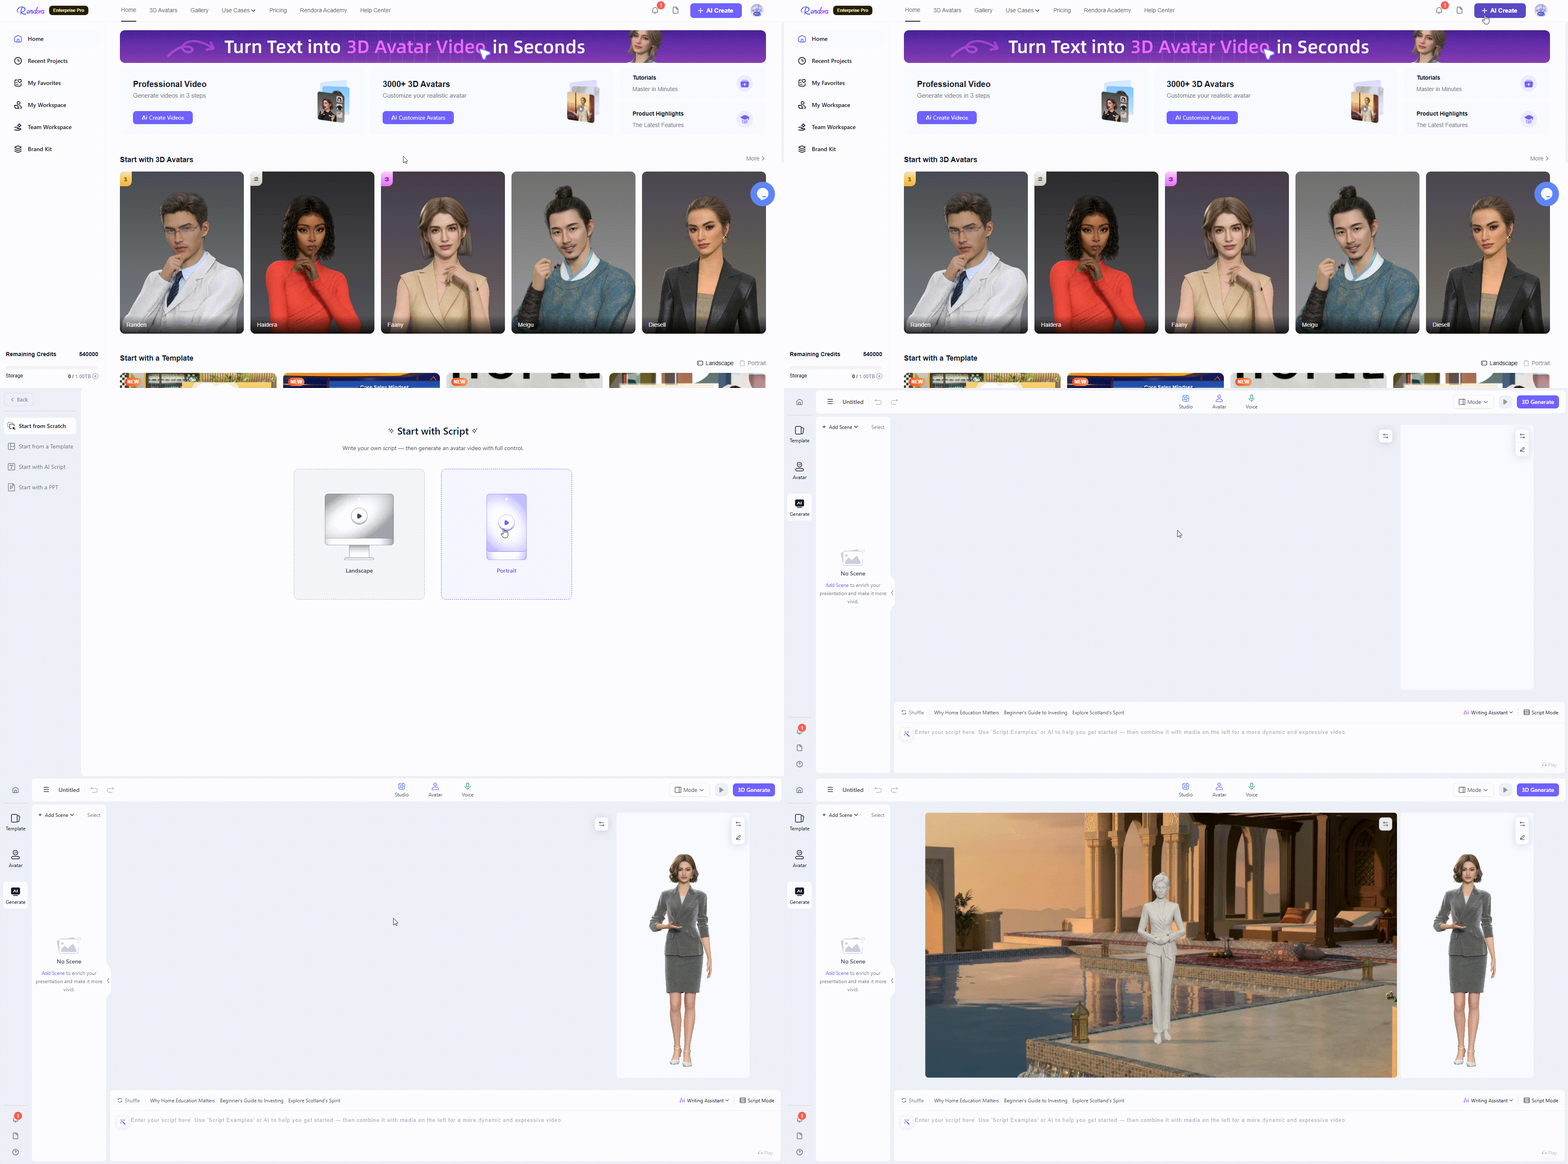
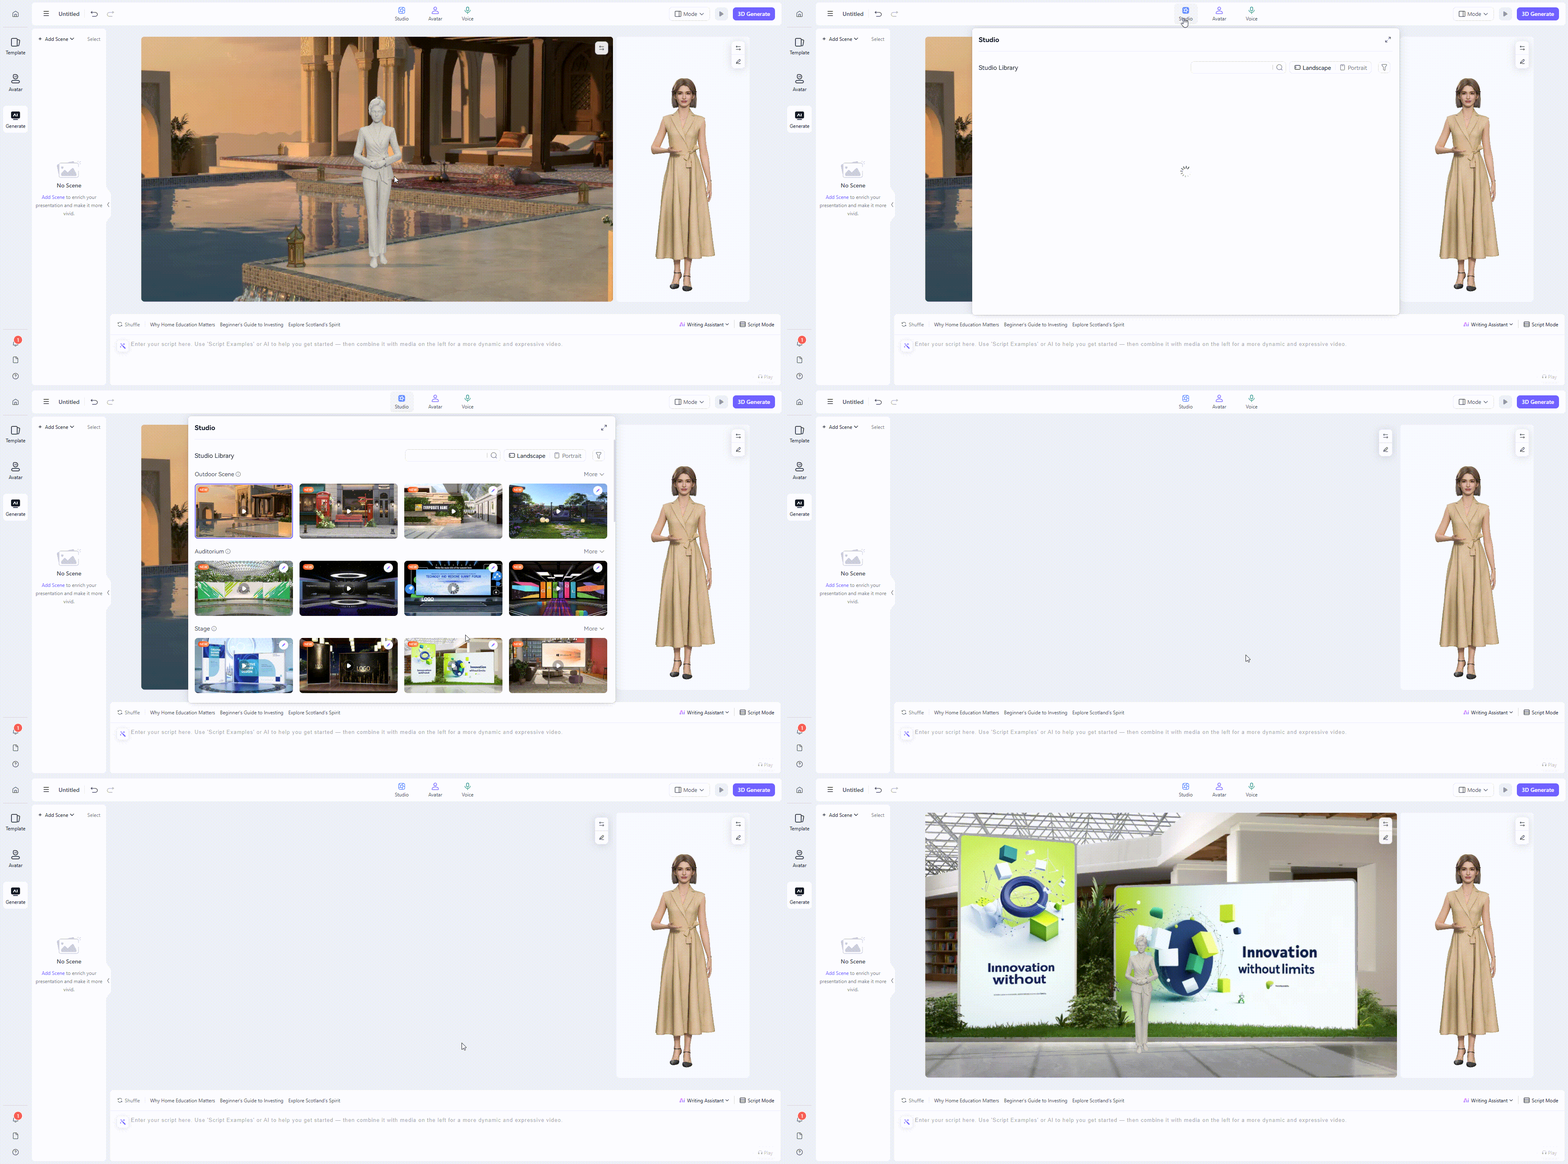
2. In the top navigation bar, select or replace your Studio and Avatar. Use filters for quicker searching.
![]()
3. Enter your script in the Text box or use Writing Assistant or preset scripts, then click [3D Generate].
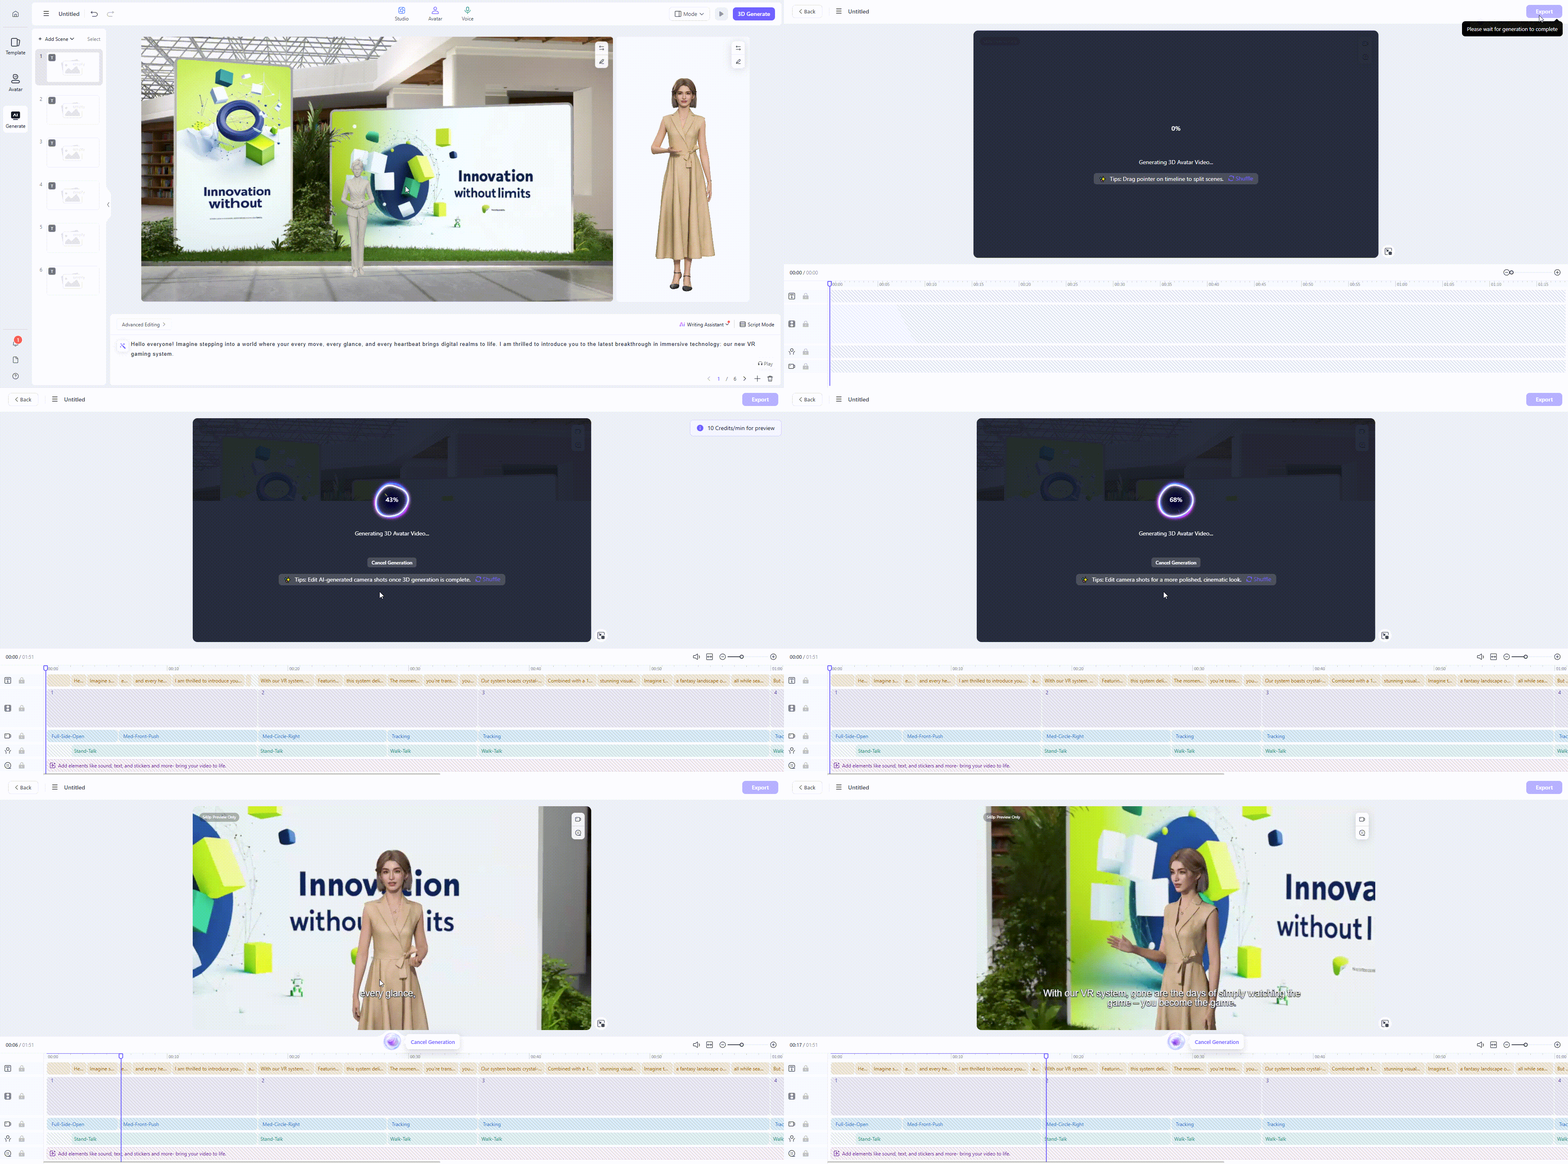
4. Review the result and click [Export] to finish your Rendora video.

2. Credit Consumption
- Writing Assistant
- Issuing Generation Command: Uses minimal credits and immediately applies script changes.
- Cloud Rendering: Uses more credits. You can interrupt this process to optimize shots before final rendering.

Ⅲ. Core Features
1. Studio Settings
Rendora offers a variety of high-quality 3D studios that accurately simulate real-world lighting and physical effects. It supports multi-angle camera movements to deliver high-quality studio visuals.
Studio Library
The Studio Library offers a variety of high-quality 2D and 3D studios to enhance your video’s visual effects.
- How to use:
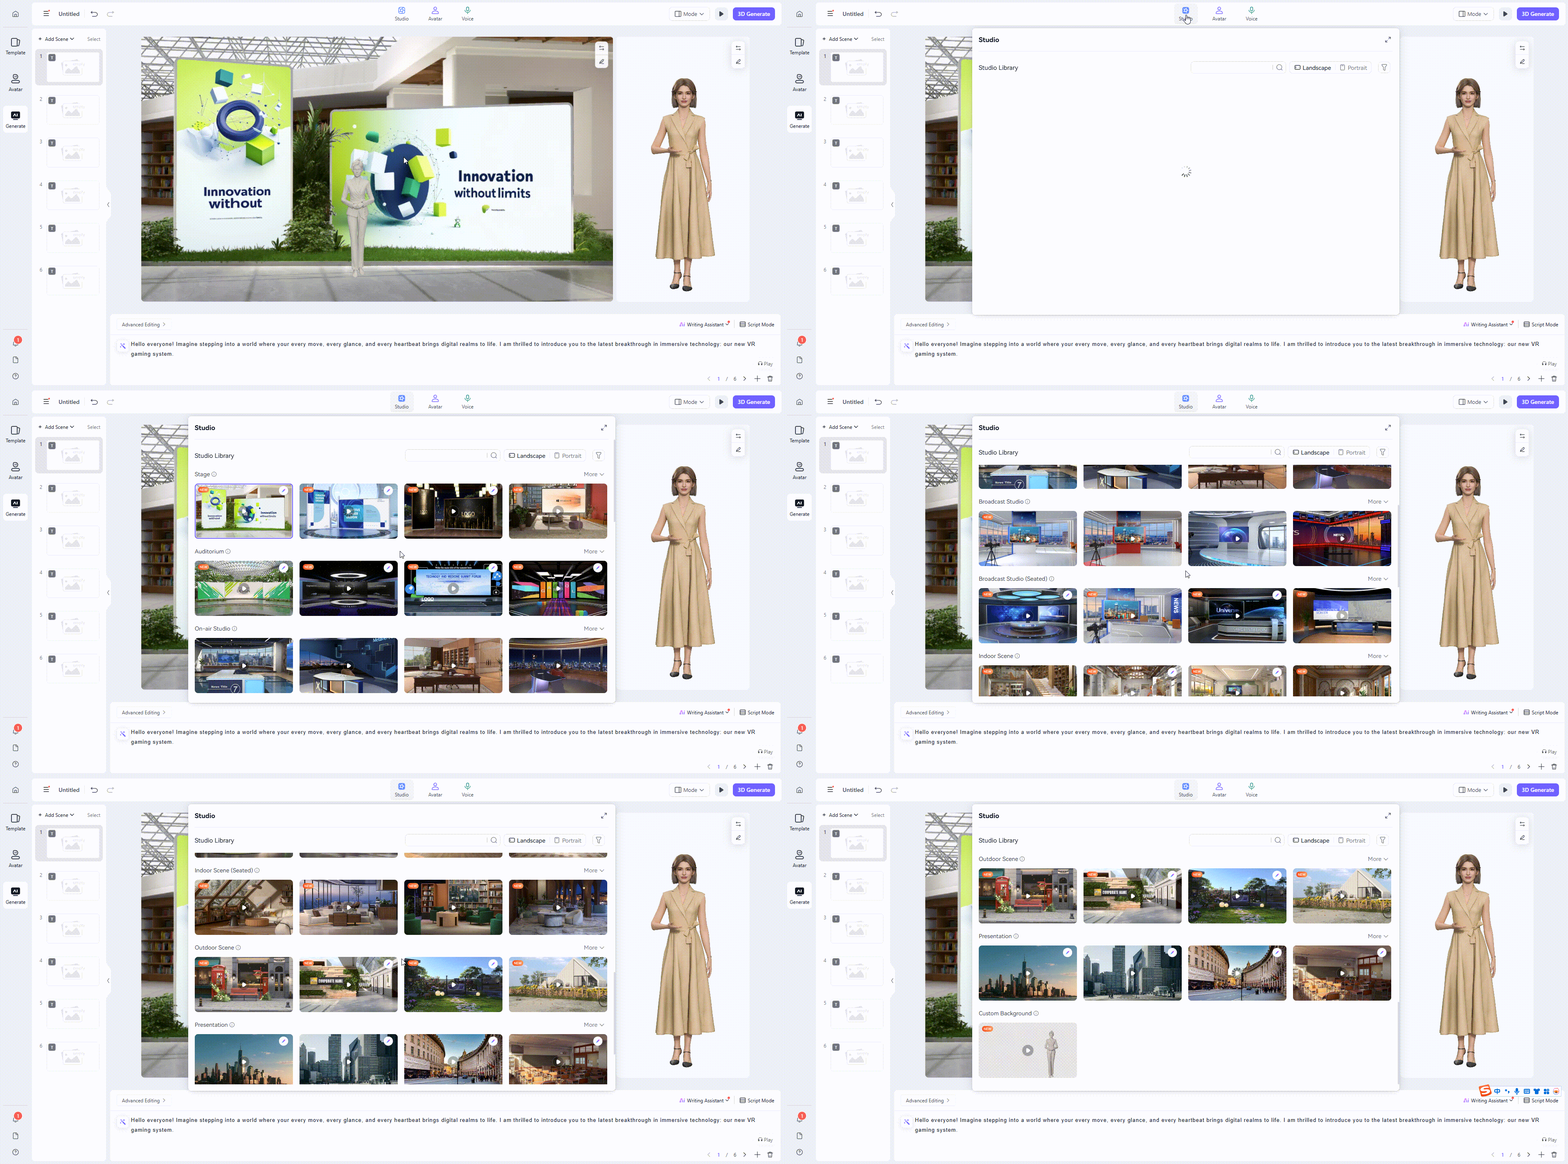
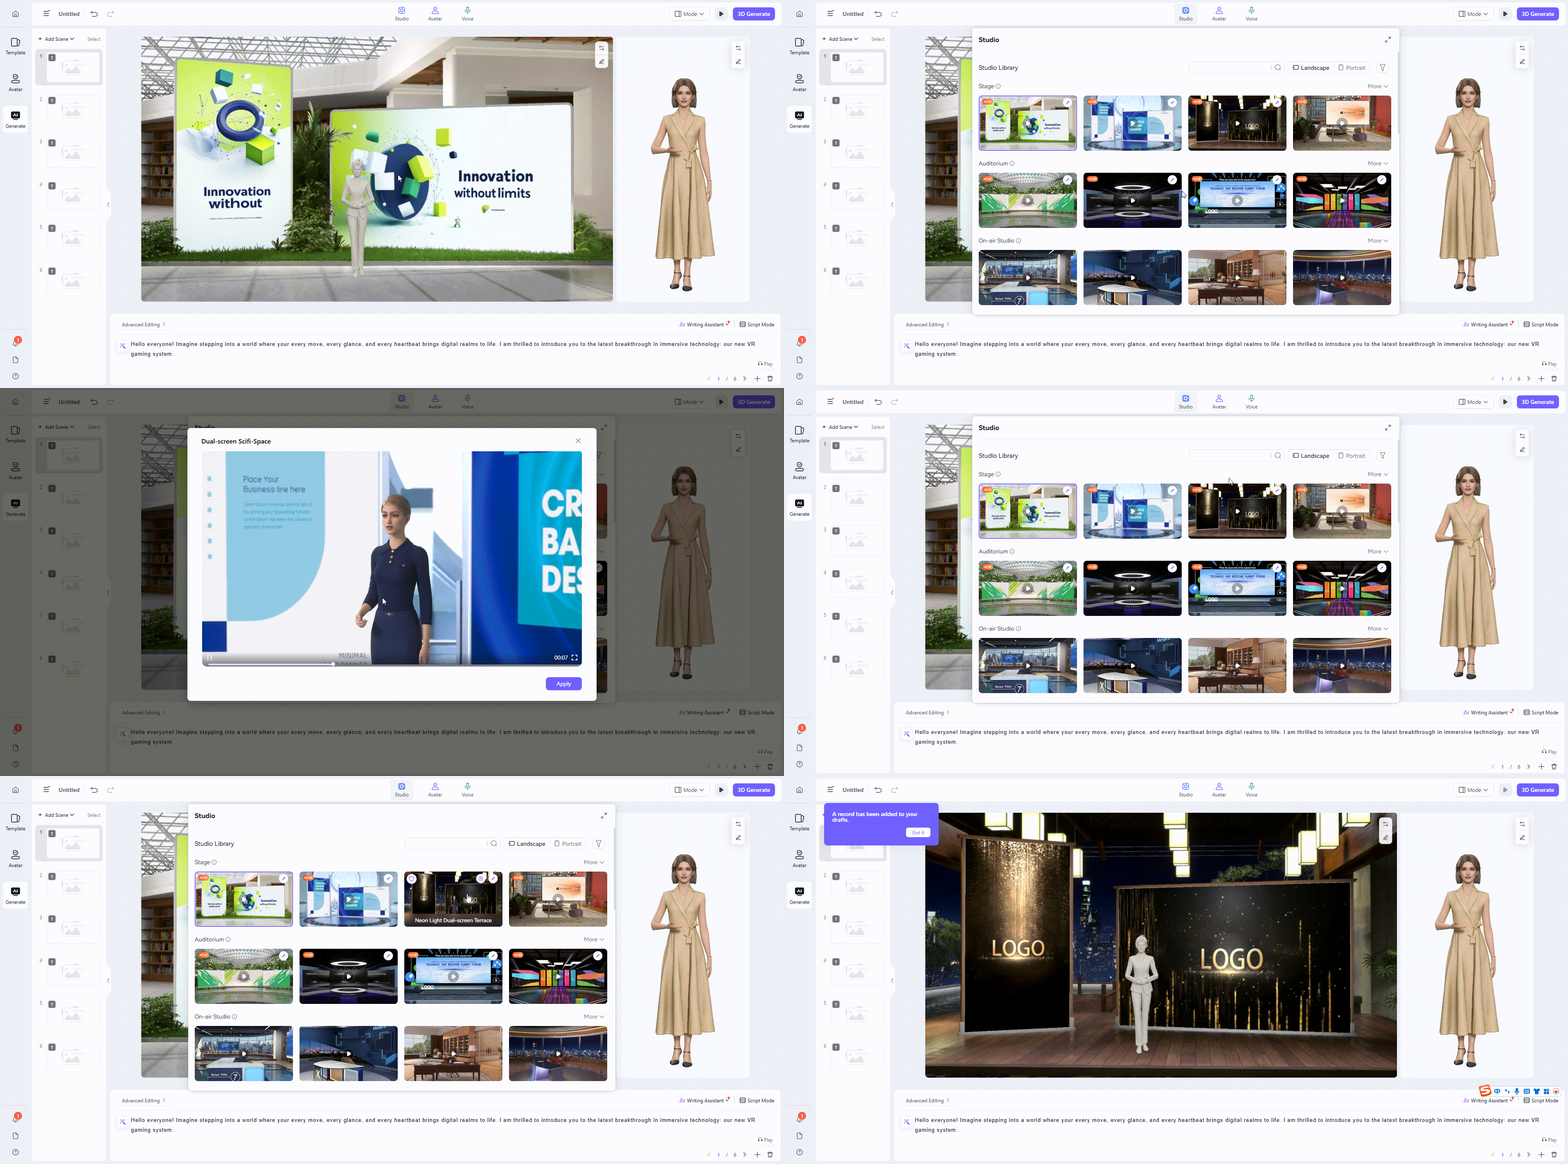
- On the AI Generation page, select [Studio] from the top navigation bar, or click [Change Studio] at the top right of the scene preview to switch scenes.
- Browse the studio library to find suitable video scenes. Click the “More” button to view all types and access more scene resources, helping you select the most fitting scene.
- Click the magnifying icon in the top right to enter full-screen mode for quick browsing of additional studios.
- Studio Filtering
- On the AI Generation page, choose [Studio].
- Click the funnel icon to filter studios.
- Filter options:
- Layout: Filter by layout needs.
- Style: Select the desired design style.
- Scenario: Pick a scenario (e.g., "Business Training" or "Events").
- Color: Choose the main color theme.
- Editability: Filter by template editability.

- Previewing, Selecting, and Editing Studios
- Hover the cursor over a studio cover to preview its dynamic effects.
- Click on a studio cover to select it.
- After performing [3D Generation], your chosen studio will be applied.
- My Studio
- Manage and view your saved studios for future use.
- Click the My Studio option under [Studio].
- Browse your saved studios to use, edit, rename, or delete them as needed.

2. Avatar Settings
MagicFace’s self-developed full-stack GenAI capabilities empower 3D Avatars with not only high-quality appearance and expressive communication skills, but also the professionalism of an enterprise employee. In terms of appearance, YOUYAN offers a rich library of ultra-realistic 3D Avatars. High-precision modeling ensures that every detail—such as hair highlights, skin texture, and fabric—appears vivid and clear. The Avatars support multi-angle dynamic display, delivering a cinematic level of character realism.
Please switch to the 3D Avatar section to view more setup and operation guides. Easily select and manage your virtual hosts.
3. Script Settings
Rendora generates videos in the form of video scenes. You can structure your video by creating multiple scenes—similar to how each slide in a PPT makes up a complete presentation. Each scene allows you to freely input text, use AI to generate scripts, or upload local text files as scripts.

AI Script Generation
Use AI to automatically generate scripts tailored to your topic, offering two generation modes for different needs. AI also supports dialog-style rewriting.
How to use:
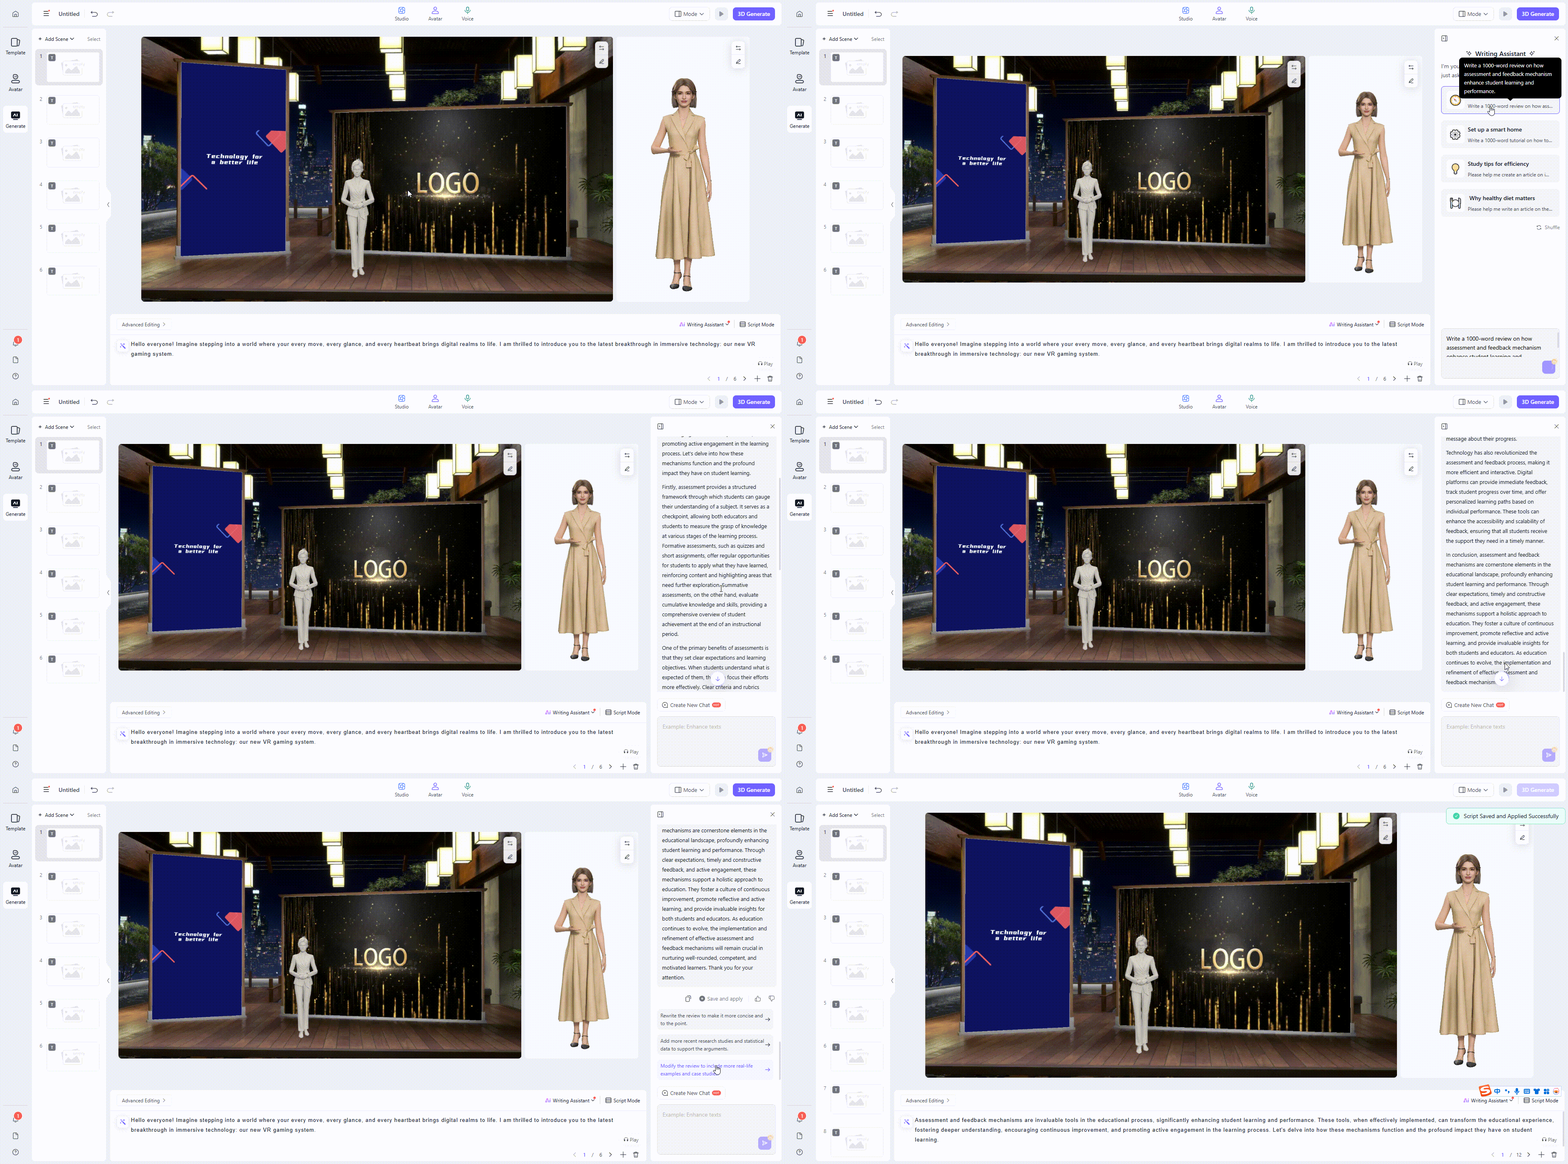
- On the [3D Generation] page, click "Writing Assistant" above the text box in the lower right corner, or hover to expand and select "Writing Assistant."
- Enter key information for your video, then click "Generate Now."
- The generated script will appear on the [AI Script Assistant] page. You can:
- Copy: Click "Copy" to use it elsewhere.
- Edit: Paste it into the script box to modify.
- Save and Apply: Click "Save and Apply" to use the script directly for creating a video segment.
Script Optimization
AI can help rewrite scripts with options for improving expression, stylization, expanding, condensing, or translation.
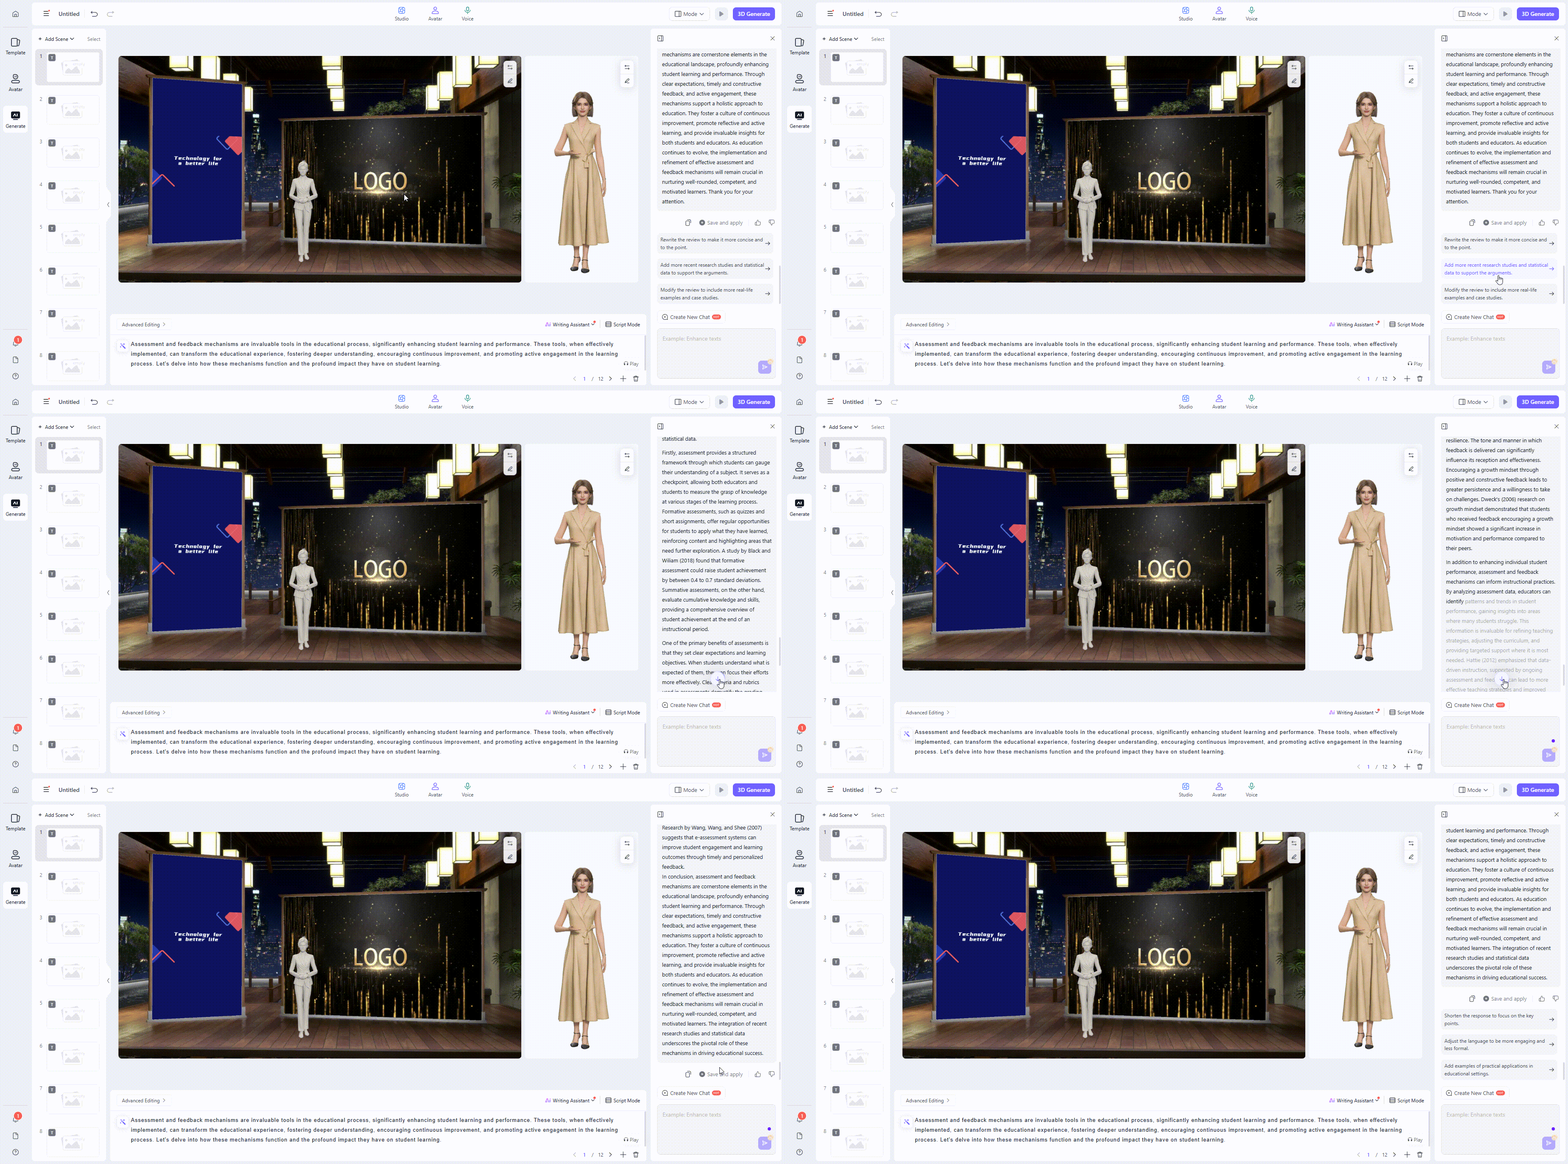
- Optimize the entire script:
[3D Generation] > "Writing Assistant" > Select mode "Generate Now"
In [AI Script Assistant], enter your request below the text (e.g., "improve expression," "stylize," "expand," "condense," "translate").
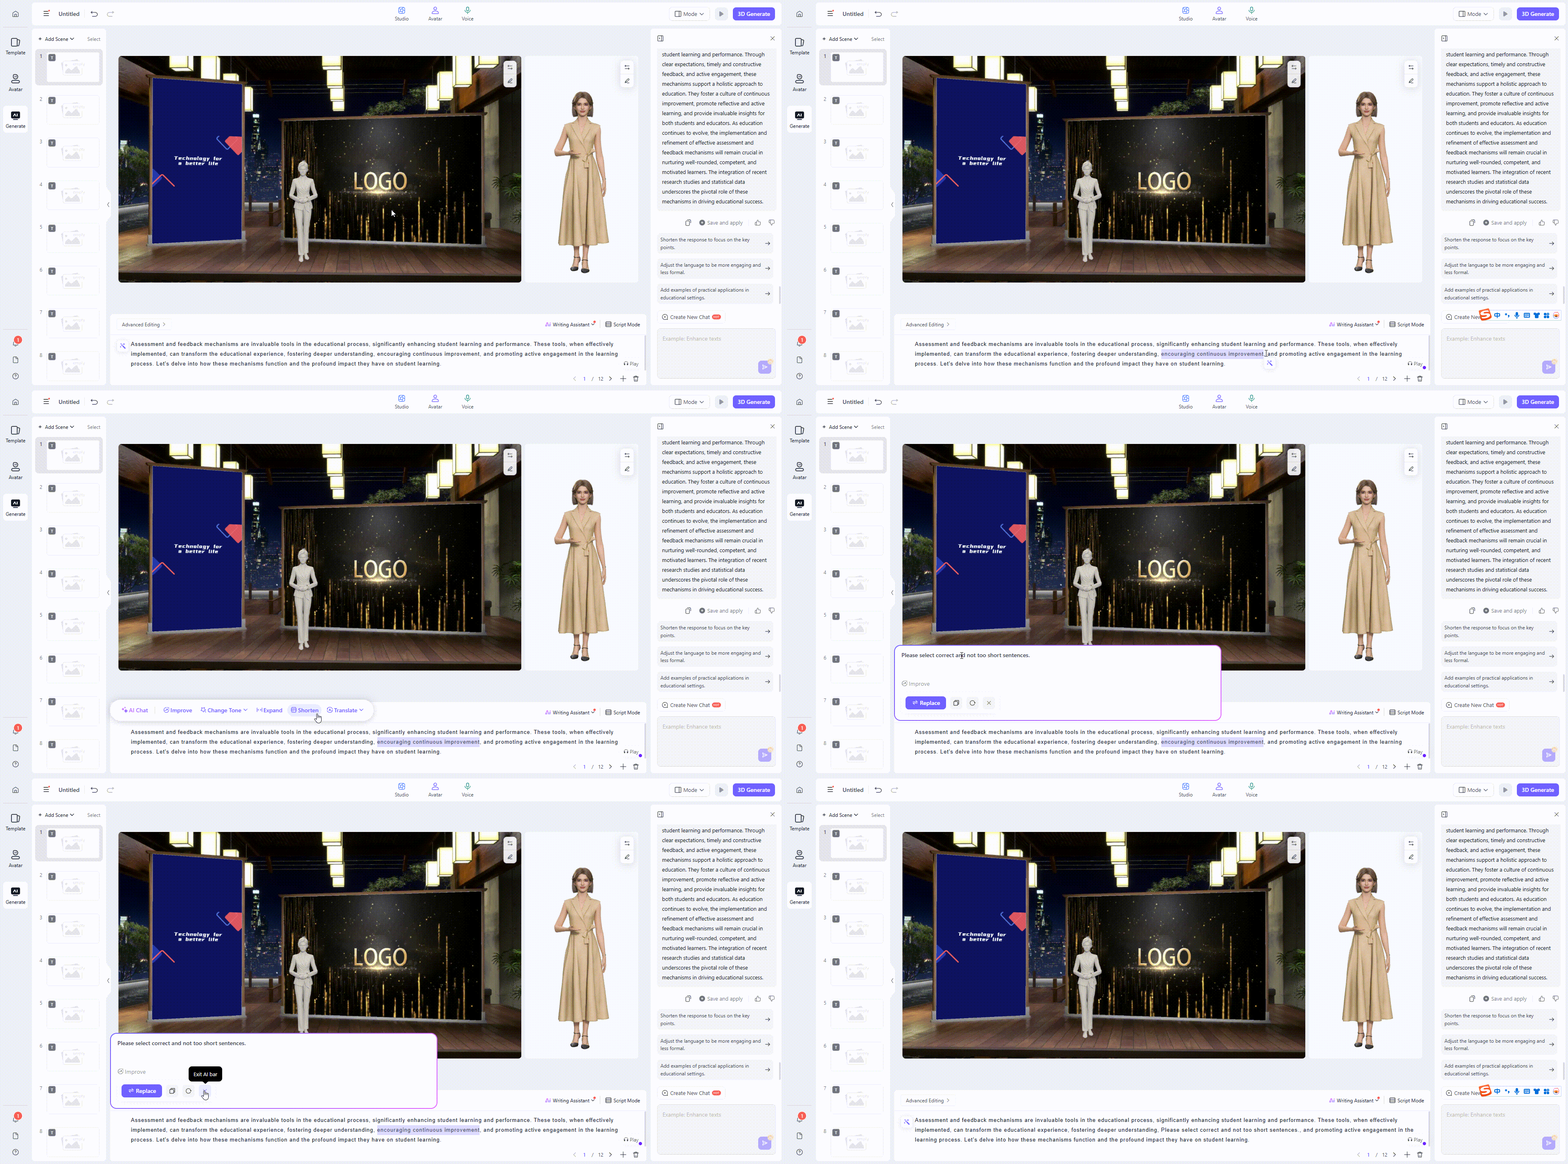
- Optimize script segments:
[3D Generation] > "AI Script Generation" > Select "Generate Now"
[AI Script Assistant] > "Edit" > Select the text segment > enter your request for rewriting or editing.
Uploading Local Scripts
Upload local doc, docx, or txt files for further editing and use.
How to use:
- On the AI Generation page, hover over [Writing Assistant] above the text box and select [Upload Script].
- Choose your file; it will appear in the [Library].

Script actions:
- Apply All: Apply the whole script to all scenes in order.
- Apply: Add selected script segments to the scene.

- Edit: Double-click or right-click to edit scripts in the library.
- Delete: Select a segment, then clear its contents from the script box.
Saving Scripts
You can save multiple script versions.
How to use:
- Enter or edit your script in the text box at the bottom of the AI Generation page.
- Hover over [Writing Assistant] to expand options and choose [Save Script].

Editing Scripts
Edit, split into segments, or view all content in the text box at the bottom of the AI Generation page. Select any script to edit, split, or expand as needed.
4. View Modes
- Studio Mode (default): See live updates as you edit.
- Media Mode: Focus on verifying and reviewing assets.
- Script Overview Mode: Edit all scripts in one view.

5. Post-Generation Editing
- Export: Export the generated video directly to your Personal Space as a finished product, making it easy to share or publish.
- After video generation, a 540P low-resolution preview will play automatically on the video generation page. Once you’ve reviewed and confirmed that all scenes and visuals are correct, click the [Export] button in the upper right corner to export a high-definition video in a higher resolution.


- Continue Editing: Further edit and re-generate as needed; all changes must be re-generated.
- Method 1: Click the Edit button on the far left of the corresponding section in the timeline below to enter the editing page.
- Method 2: Click the Edit button in the upper right corner of the video to enter the editing page.
- Method 3: Hover your mouse over the desired position on the track, then click the Edit button that appears to enter the editing page.

After making edits on the editing page, you need to click 3D Generate again for the changes to take effect.
If you do not wish to apply the changes, you can click Back in the upper left corner to return to the last version generated by 3D Generate.
- Shot Optimization: Two methods are available for customizing shots to ensure the desired effect.
- Replace shots: Click the shots library tag on the timeline, then choose any shot effect from the library on the left to replace it.
- Customize shot duration: Press and drag the start and end points of a shot on the timeline to adjust its duration.
- Note: After refining your shots, be sure to click [3D Generate] again to regenerate the shot effects.

- Video Elements: Add/adjust music, sound effects, subtitle, stickers, intro, and outro.
Ⅳ. Advanced Features
1. Drafts and Copies
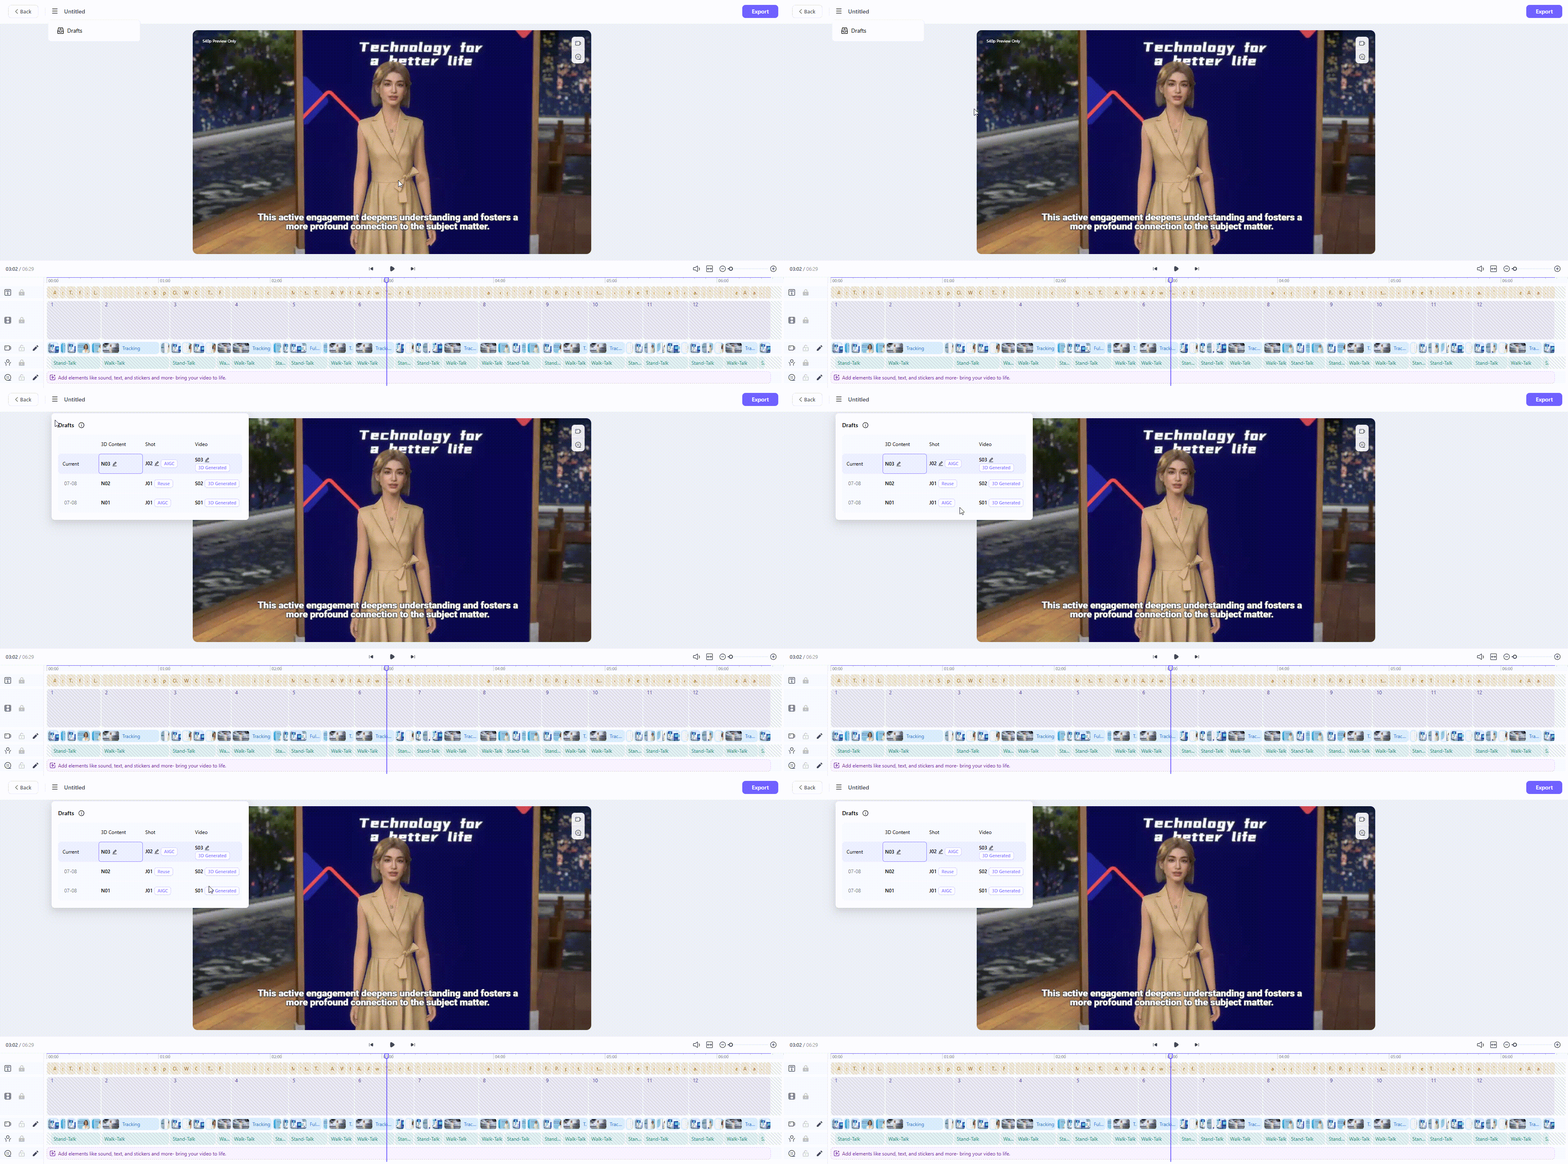
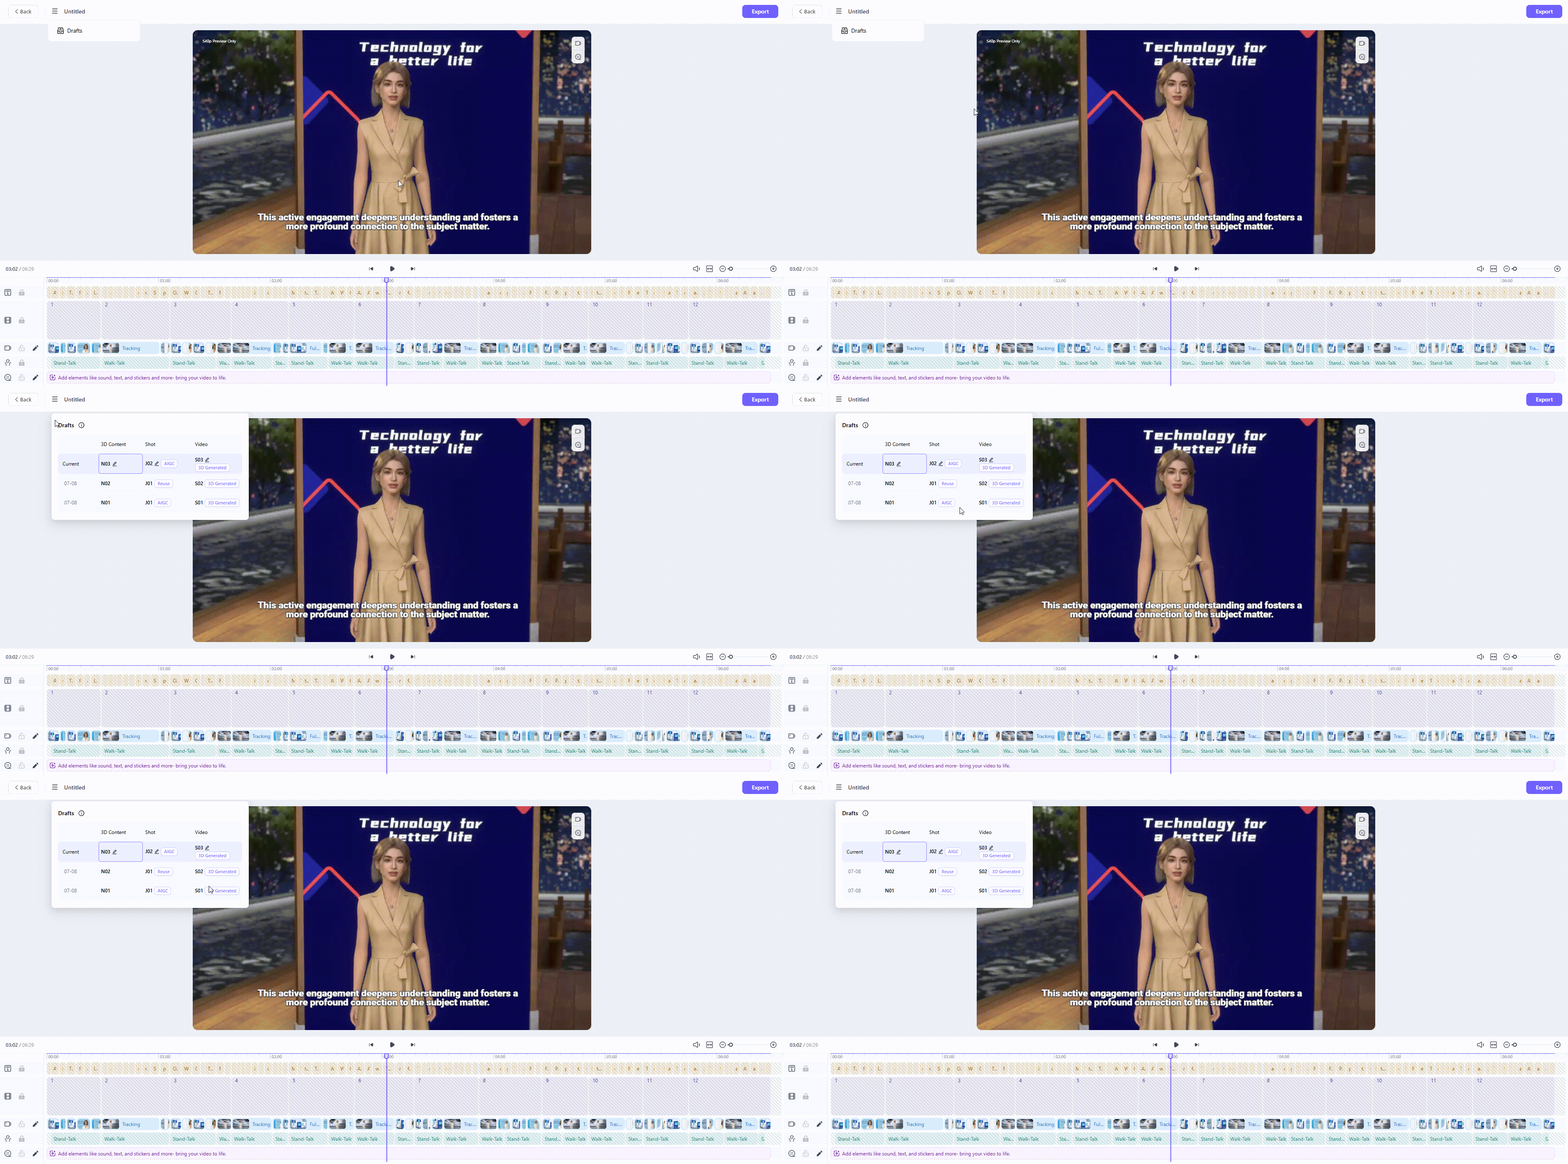
- Drafts
- Automatic saves at each stage, allowing rollback, rename, or reuse.
- Easily restore or copy visual elements from past drafts for fast re-editing.

- Create a copy
The create copy operation can copy the current work to the personal space, open the copied work in a new page, and allow editing in the new page.
Operation path:
- Enter an editable video/while currently editing a video;
- Click the "More" - "Create Copy" button in the top-left corner to create a new copy.
Note:
After creating a copy, the default location is the newly created copied work page.
The copied work retains only the latest draft record as the initial draft of the work and does not inherit the historical drafts of the original work.
2. Voiceover Settings
- Multi-language, realistic TTS voiceovers available.
- Set global speed, tone, and volume for avatars.
- Preview voiceovers before finalizing.

3. Scene Editing
- Add, delete, copy, paste, reorder, or resize text and multimedia scenes.
- Generate selected scenes only (partial rendering to save credits).

4. PPT Editing
YOUYAN’s PPT media library offers a wide selection of beautiful templates and flexible editing tools for efficient creation and customization.
4.1 PPT Media Selection & Editing
- Function Overview:
YOUYAN allows users to start a new project using PPT materials and offers a brand-new, editable PPT media library. This helps users efficiently select and edit PPT media before generating videos, streamlining the creative process. - How to Use:
- Create with PPT: On the homepage, click Create. In the left-side menu, select Start with PPT. You can either use your local PPT files or choose from Rendora’s PPT templates to begin your project.
- Create with PPT Templates:
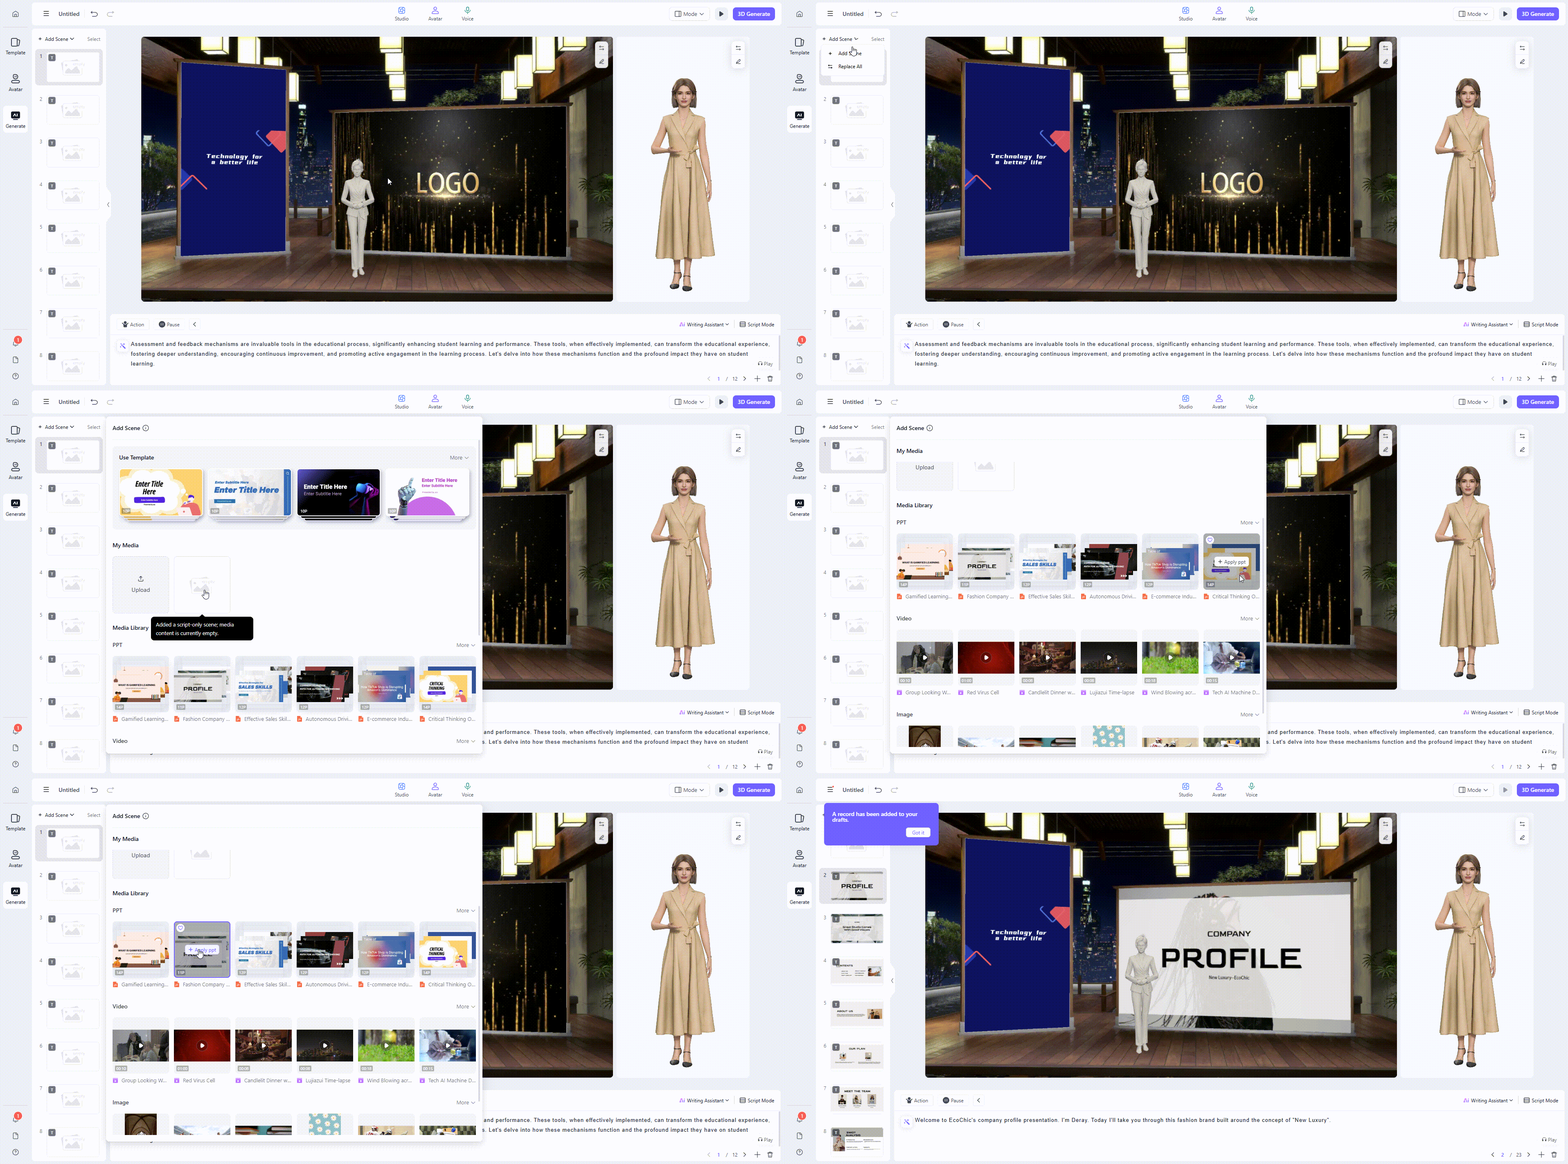
On the 3D Generate page, click Add scene in the left panel. Select your desired PPT template, click Apply on the cover to choose the pages you need. Or click Upload to use your own local PPT material.
To edit a local PPT file, click the Edit button on the cover.
Rendora currently supports PPTX and PPT formats, with file sizes up to 200MB.
- Editing Capabilities:
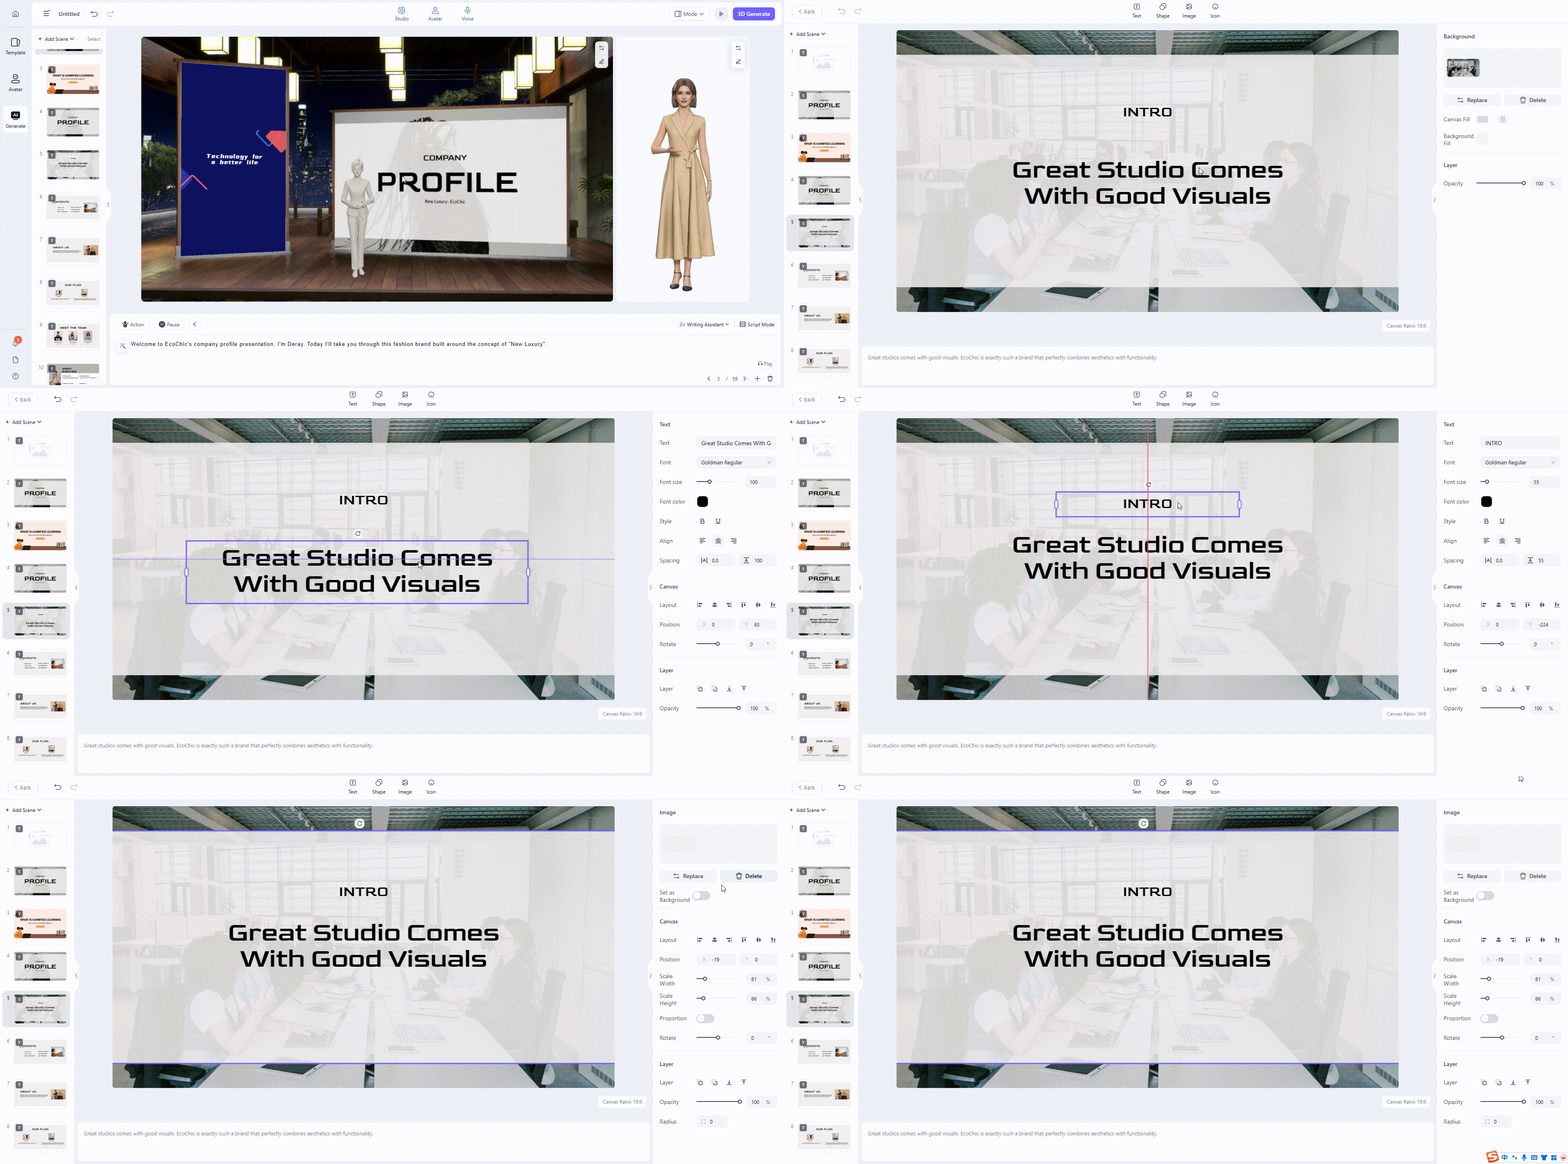
On the editing page, you can freely modify text, font, images, and colors, or add animation effects to make your presentation more dynamic. Online editing is also supported for custom-uploaded PPT media, allowing real-time adjustments and optimization.
- Saving:
Once you finish your PPT, it is saved automatically. Click [Back] to return to the studio editing page.
4.2 Applying PPT Media to a scene
- Function Overview:
Edited PPT media can be directly applied to video segments, making creation straightforward. - How to Apply:
On the AI generation page, click Add scene. In My Media, find your saved PPT media, click on it, and instantly add it to your project’s segments for video creation.
4.3 Common PPT Editing Operations
- Edit text, fonts, images, colors, and more:
Freely customize any element in the PPT to match your preferred style and content. - Copy, paste, and delete layers:
Conveniently adjust the visual arrangement by copying, pasting, or deleting layers: - Select the layer you wish to modify.
- Press Ctrl+C to copy, Ctrl+V to paste.
- Select the layer you want to remove, and press Delete.
5. Video Editing
Easily manage and edit video media to ensure every part of your video aligns seamlessly with your overall content.
5.1 My Media
Upload and manage your personal media files. Flexibly apply your media scenes to different video segments to match various scenarios.
5.2 Upload Methods:
- Click Add scene at the top of the left segment panel to upload multiple media files at once. Then, drag the desired media into the segment for use.
- Select a segment and upload media directly to that segment.

5.3 Media Library
The media library centralizes the management and application of various media files, supporting batch uploads and segment-based use.
How to Use:
- Click the Upload button in the left “Media Library” to upload multiple media files at once. Once uploaded, simply drag media from the library into your segment.
5.4 Media Editing
Adjust details such as media length, aspect ratio, and volume to optimize visual and audio performance.
How to Edit:
- Method 1: Hover over a segment and click the “Edit” button in the upper right corner of the segment.
- Method 2: Right-click the desired segment and select Edit media.
Tip: Right-clicking a segment also allows you to replace or remove the media in that segment.

Media Cropping
- Select media, then adjust ratio, position, and other parameters in the panel on the right.
- Manually scale media to fit the screen ratio.
Video sceneping
- Enter the editing workspace, select the video scene on the timeline, and trim the video length by dragging either end, or use the Split function to cut the video in the middle.
Sync Video with Voiceover
- Adjust video length to match the voiceover, ensuring the video is not too short or too long compared to the narration.
Change Video Speed
- Use the Speed feature to speed up or slow down your video, lengthening or shortening the scene duration as needed.
Add Media
- To add more scenes, click Add scene (top left), upload new videos, and drag them onto the timeline for editing and adjustment.
Adjust Volume
- Click the “Speaker” icon on a scene to easily adjust the media volume.
6. Avatar Performance Control
Take full control of the avatar’s performance in your video, making their actions more dynamic and natural.
6.1 Add Custom Motions
Add custom motion shots to your text content, ensuring the avatar’s actions suit the scene and enhance expressiveness.
How to Add:
- Go to the 3D Generate page and select the position where you want to add a motion.
- Click the Advanced Editing - Motion button in the toolbar to open the motion library.
- Browse the motion library by category and select the appropriate motion for your content. Click a motion to add it to your text segment.
- To change or remove a motion, reopen the motion library from the motion tag position. Click Delete or the Remove button in the bottom right corner to delete the motion.
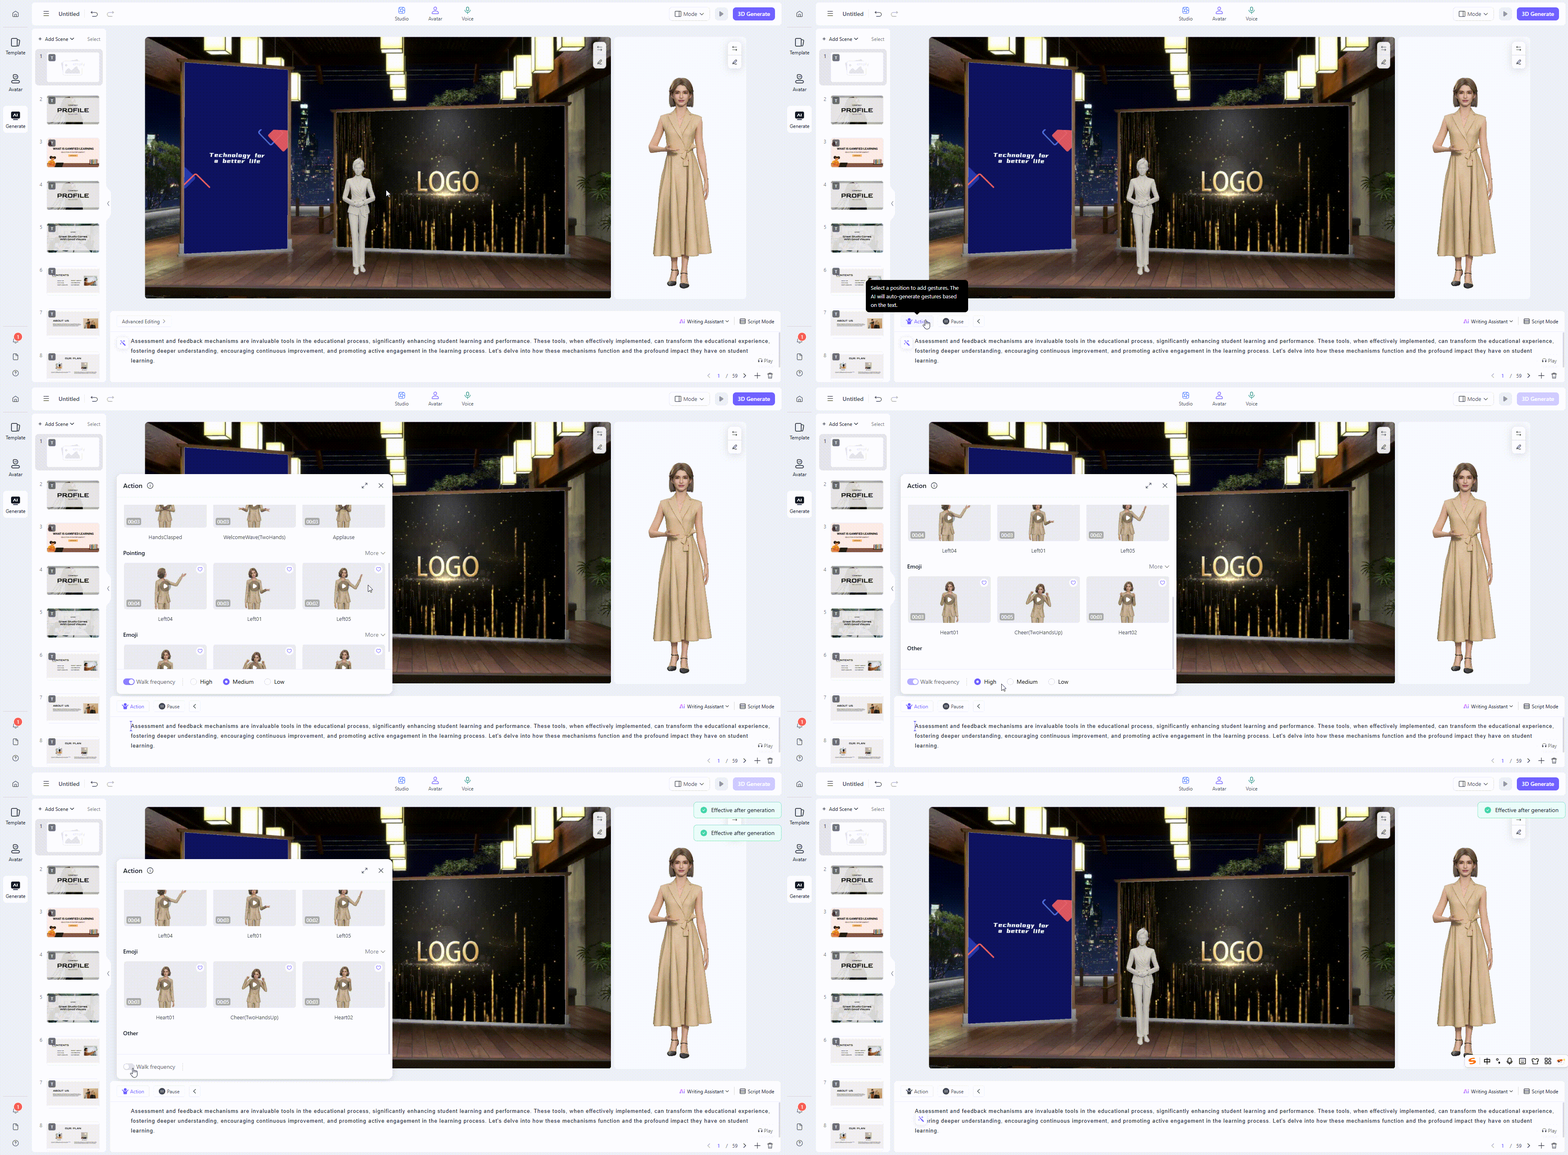
6.2 Customize Walk Frequency
In certain scenarios, the system will make the avatar walk on stage. You can customize the walk frequency or disable this effect as needed.
Factors Affecting Walk Effect:
- Scene: Large stage and small stage scenes support walking actions; other scenes do not.
- Media:
- If you use video media, the system assumes you want to focus on the video content, so walk effects won’t trigger. To enable walking, replace the video with an image.
- Pure text scripts longer than 30 seconds are more likely to trigger walking.
- Frequency: Higher walk frequency settings increase the chance of walking actions.
How to Adjust:
- To adjust walk frequency, click the [Motion] button in the toolbar. Find the walk frequency setting at the bottom of the motion library and choose the desired level.
- To disable walking, simply turn off the walk effect on this page.
- Ensure enough distance between different motions. If motions are placed too close together, some actions may not work as intended. Adjust your script to keep adequate spacing between motions for best results.

Ⅴ. Special Features
1. Pause
Allows you to insert pause markers within the text. When the audio reaches a pause marker, playback will stop until the specified duration has finished.
2. Batch Phonetic Annotation
Enables you to add correct pronunciations to text, with the option to annotate multiple words at once.
3. Sensitive Word Filtering
Automatically detects and alerts you to common sensitive words used by major short video platforms—no manual action required.
4. Spelling Correction
Identifies misspelled words and suggests the correct spelling.
Ⅵ. FAQ
Q1. Why are my images blurry?
Preview resolution is intentionally low; images will be high-res in exported videos.
Q2. Why does the preview lag?
Preview lag is often due to network delay and won’t affect the exported video.
Q3. Why can’t I generate a video?
Check if you have enough credits; otherwise, contact customer support.
Q4. Why did my media upload fail?
Ensure the format and size meet requirements and your connection is stable.
Q5. Why did video generation stop unexpectedly?
This may be due to network issues or insufficient credits.
Q6. Why is my AI voice distorted?
Try regenerating after checking your connection.
Q7. Why is rendering slow?
Video complexity, resolution, and server load all affect rendering. Optimize for faster results.