Shot Editing
Ⅰ. Quick Start
Ⅱ. Getting to Know the Rendora Shots
The lens is the core tool for visual storytelling, conveying narrative information, expressing emotion, and controlling rhythm through composition, movement, and editing.
Rendora features the world’s only 3D camera shots genAI technology, which enables one-click generation of shot sequences. It can intelligently generate diverse shot sequences based on users' media, while also allowing users to edit shots manually. The Rendora Shot Library offers multi-dimensional options across shot scale, camera angle, and camera movement.
Note:
The Rendora Shot Library provides comprehensive options, including:
- Shot Scale: Close-up, Close, Medium, Full, Large, Wide, Full screen
- Camera Movements: Fixed, zoom in, zoom out, tilt, surround, tracking, pan
Ⅲ. Shot Editing
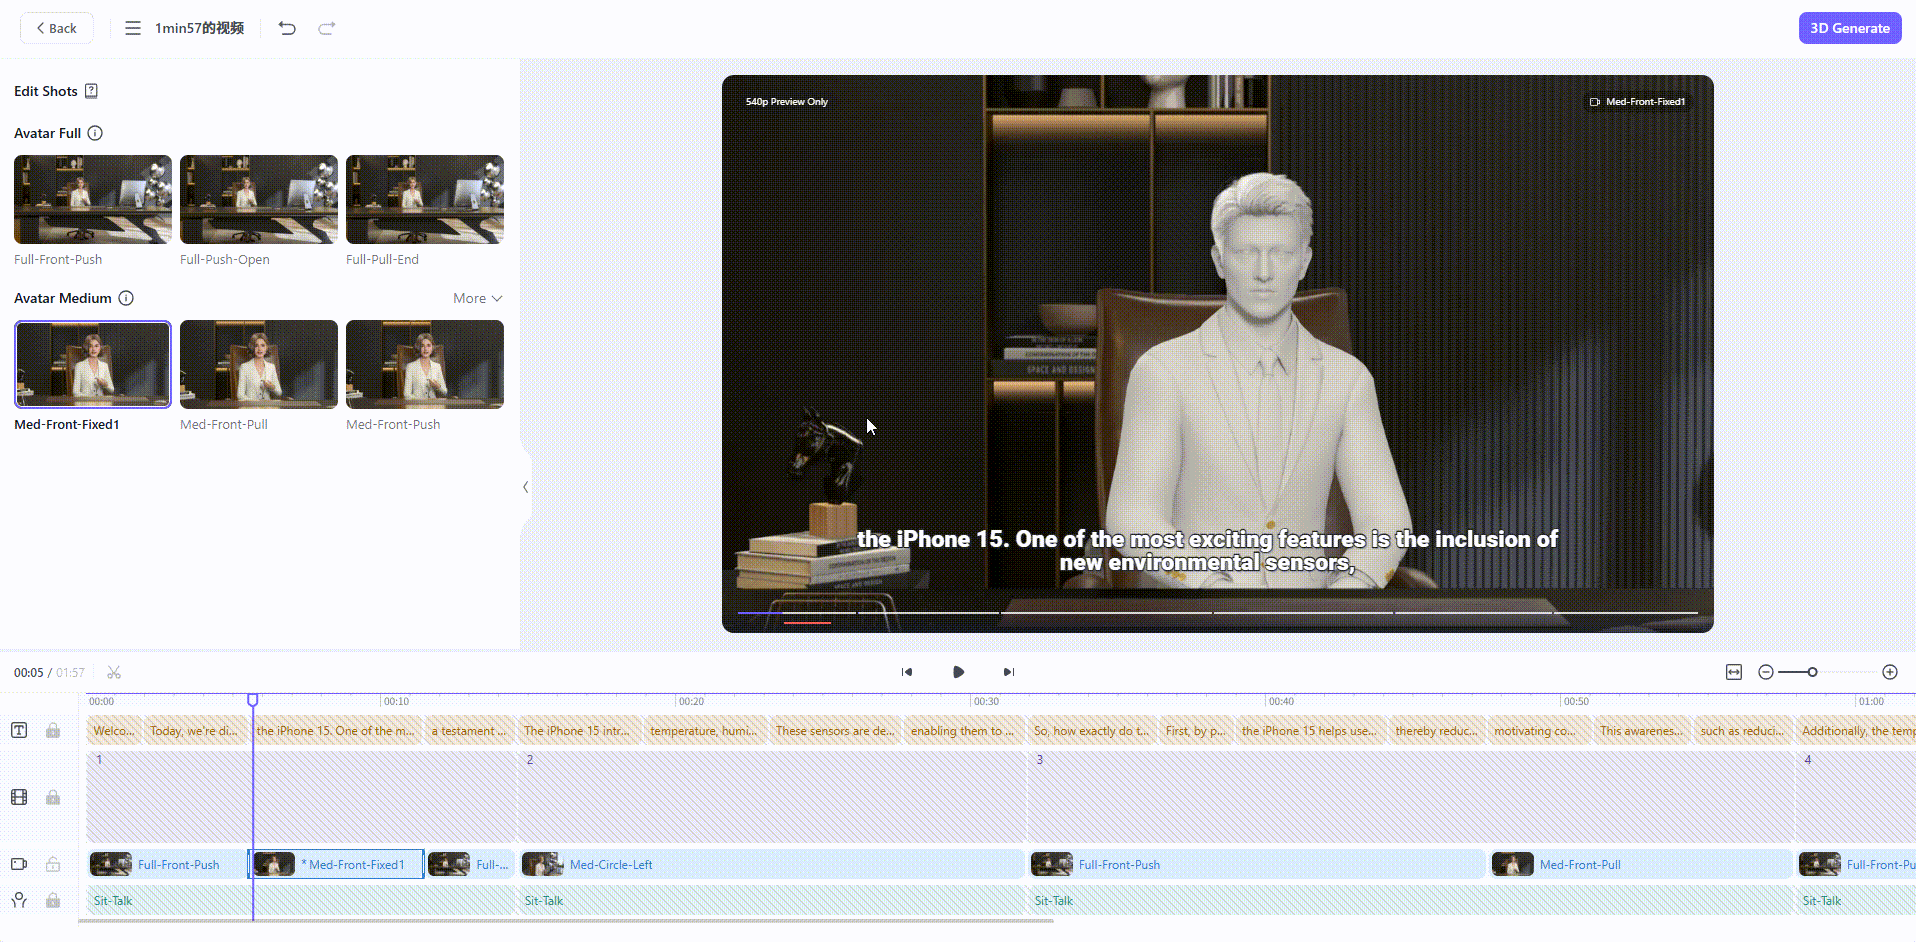
During the 3D generation, the system will intelligently generate a sequence of Shots for your video. If the preset shots do not meet your creative needs, or you require more precise control over the camera effects, you can customize shots to better align with your video’s theme. To adjust shots, you can access the shot editing page in one of three ways:
Shot Editing Entrance:
- Method 1: Enter by clicking below to switch to the [Shots] editing mode.
- Method 2: Click the edit button on the far left of the shot track in the lower timeline.
- Method 3: Click the edit button directly on the corresponding shot in the timeline shot track below.

Edit Shots:
- Replace Shot:
Enter the “Shot Editing” page via any of the above methods. On the timeline below, select the shot segment you want to change. Then, choose the desired shot from the “Shot Library” on the left to complete the replacement. - Adjust Shot Duration:
To change the duration of a shot, select the shot segment in the timeline and drag its edge to the desired position to modify its length. - Split Shot:
- Select the target shot segment, then click the "Scissors" above the timeline to enter split mode. Split nodes will appear on the track; hover over the desired node and click to split the shot segment.
- After splitting, you can use the aforementioned methods to change the duration or replace individual shots for more refined editing.
Note: Each segment must contain at least one shot, and each shot can only be edited within its segment (shots cannot be moved across segments).
Once editing is complete, click the play button to preview the result. When the shot effects meet your expectations, click [3D Generate] in the upper right corner to finalize all shot edits.
Ⅳ. Shot Selection
The “Shot Library” allows you to browse all available shots, with full motion previews on mouse hover. Shots are categorized by five main shot scales (Close-up, Close, Medium, Full, Large, Wide, Full screen) and two main types (Presentation Shot and Avatar Shot).

1. Presentation Shots
- Core Purpose: Designed for the visual presentation needs of PPTs, images, videos, and other materials.
Shot Type | Application Scenarios |
Full/Large | Shows the full material and the avatar’s overall appearance. Commonly used for scene transitions and content display. Includes fixed and moving long shots, randomly provided. |
Full Screen | Emphasizes the core material uploaded by the user (PPT, image, or video), usually for key moments or the climax. |
Medium Shot | Partially shows the upper body of a avatar or part of the environment; suited for avatar display materials. |
2. Avatar Shots
- Core Purpose: Precisely delivers avatar actions, facial expressions, emotional changes, and scene transitions.
Shot Scale | Application Scenarios |
Full/Large | Fully presents the relationship between a digital avatar and its environment. Suitable for dialogue scenes, avatar interactions, openings, and endings. |
Medium Shot | Shows the avatar from above the knees with visible actions and expressions. Used for conversations and scene transitions. |
Close Shot / Medium Close Shot | Focuses on the avatar from the waist or chest up. Ideal for expressing emotional changes or subtle reactions, often used during scene switches. |
Close-Up | Focuses on facial expressions or details. Useful for dynamic effect creation or emphasizing the presence of a avatar, highlighting emotional or critical information. Duration for this type of shot is recommended to be kept short. |
Ⅴ. FAQ
1. Why can't I find the shot I want?
Rendora intelligently adjusts available shots in the Library based on your selected studio,script and media.
Solution:
After 3D generation, you can browse all available shots for the studio in the "Edit Shots" .
Common Reasons for Shot Mismatch:
- PIP Shots:
When the studio type is "Auditorium", "Full-Screen" shots (bottom-right, bottom-left) are not available. - Avatar Walking:
In certain scenarios, Rendora enables the avatar walking motion on stage. Only during this period can you use "Tracking" or "Full"; shot options are limited while the avatar is walking. - To generate a video where the avatar walks and speaks, make sure:
- Select "Auditorium" or "Stage" studio in the Library;
- Do not use video as media, or change video media to image;
- The script duration is longer than 30 seconds.
- Open & End:
Only dedicated "Opening/Ending" shots are available for these segments; regular shots cannot be selected. Click the shot tag to replace the opening or ending shot.